

Proper Use Of ECDIS Safety Settings
ECDIS has become the essential tool for watchkeeping officers on ships. Navigating a ship with an ECDIS is fundamentally different from navigating with paper charts. It is important that the Masters, navigating officers, and ship-owners are aware of the benefits of managing the chart display, safety settings, and alarm system of ECDIS.
ECDIS equipped vessels have been involved in a number of groundings which may have been avoided had it not been for failures in the setup and use of ECDIS safety settings and alarm systems. Inappropriate settings are likely to render the safety contour alarms meaningless. The use of ECDIS safety settings has often been overlooked by navigating officers due to either ignorance or insufficient knowledge. Deck officers may be unfamiliar with the setup and use of ECDIS alarms thereby increasing the risk of grounding in shallow waters and causing other unwanted situations.
Related Read: Real Life Accident: Improper Use Of ECDIS Leads To Vessel Grounding
Appropriate safety settings are of paramount importance for ECDIS display. These settings control how the ECDIS presents depth information, making it easier to visualize areas of water that are safe for the vessel to navigate in from those which are not.
This article will help to understand the best practice for handling safety settings on ECDIS which includes the Safety contour, safety depth, shallow contour, and deep water contour. The model of ECDIS used for illustrations is Furuno.
Related Read: Pros and Cons of ECDIS Or Paperless Navigation Of Ships
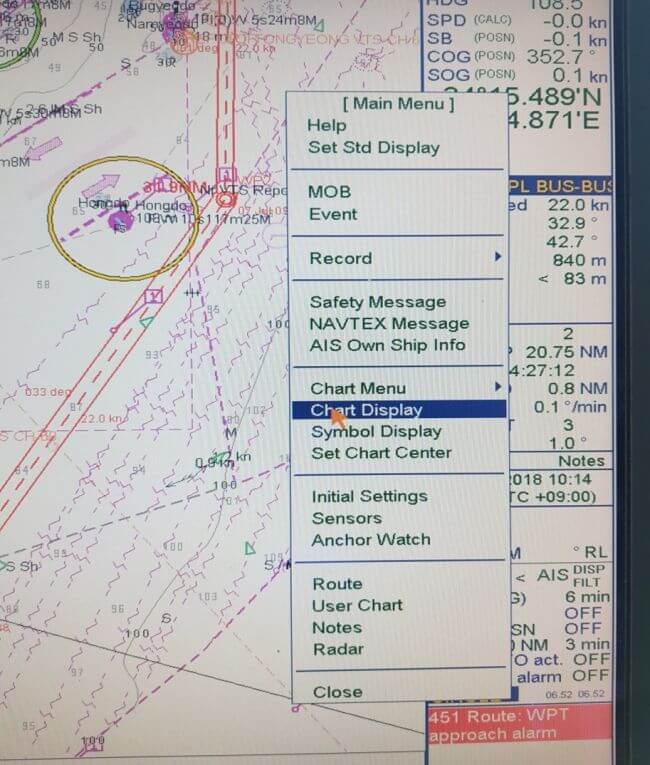
These values can be entered in Furuno ECDIS by following the steps mentioned below:
- Go to the main menu and select Chart display
- Select the Main Tab to display it.
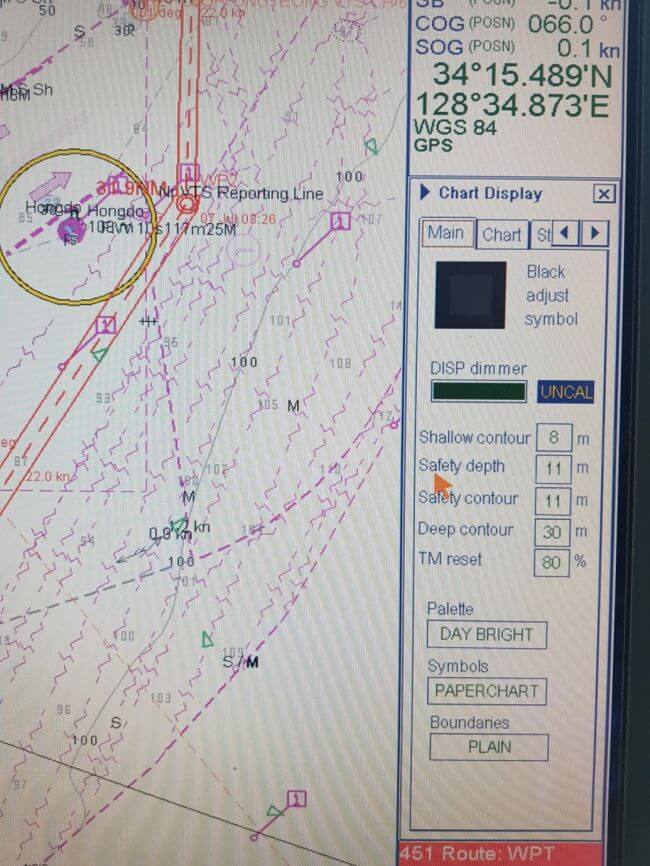
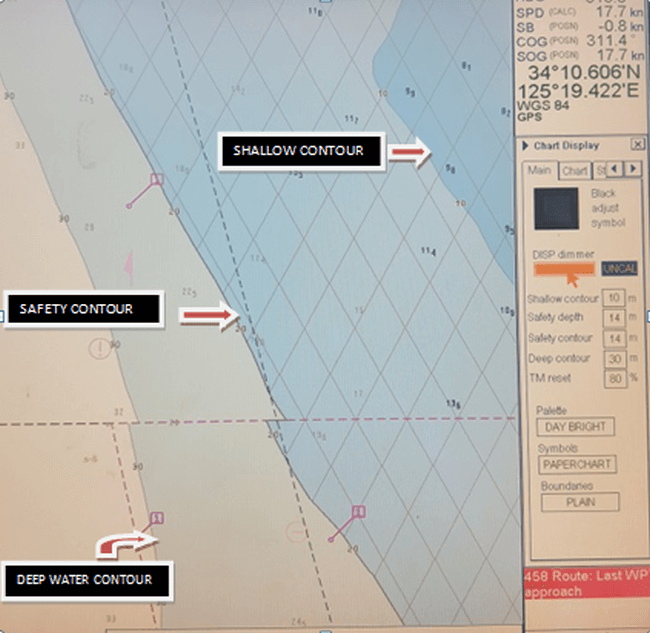
Safety Contour:
The safety contour is the most important parameter of all the safety settings for the display of unsafe water areas, detecting isolated dangers and triggering anti-grounding alarms. The safety contour is basically an outline which marks the division between safe and unsafe waters.
Related Read: Ship Stability – Understanding Intact Stability of Ships
The colour blue is used to indicate the unsafe areas while white or grey for safe areas. The default safety contour if not specified by the mariner is set to 30m. The blue colour in a traditional paper chart does not provide a vivid picture of shallow water, i.e the depths mentioned in the blue part of a paper chart may be shallower for a deep draft vessel while safe for a vessel with a smaller draft. Unlike paper charts ECDIS allows the officer to set safety parameters according to the ship’s static or dynamic particulars. The safety contour can be calculated as follows:
SAFETY CONTOUR = SHIP’S DRAFT + SQUAT + UKC – HEIGHT OF TIDE
Let us check an example.
Ship’s draft = 10 m
Let us consider that as per company policy UKC requirement is 10%. Please note that UKC calculation takes into account various factors such as sea conditions, density or increase in the draft due to rolling. It should be calculated as per company UKC calculation sheet.
UKC = 1.0m
Consider SQUAT AT MAX SPEED = 1 m
Height of tide = 1 m
Safety contour value would, therefore, be equal to 11 m.
Contours are present in the values of 5, 10, 15, 20, and 30 and so on. If the value set by the mariner is not available among the available depth contours, ECDIS selects the next deepest available contour in the ENC.
Related Read: What are the Methods To Update Navigation Charts On Board Ships?
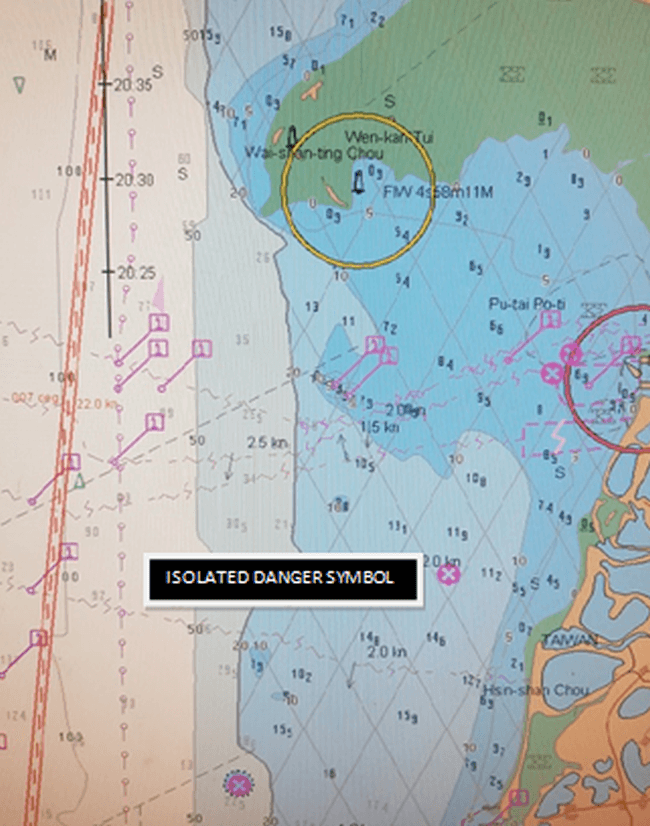
If within a specified time set by the user, the ship is about to cross the safety contour, an alarm will sound. Based on the value of safety contour, ECDIS displays the isolated danger symbol for underwater features and obstructions which may pose a danger to navigation. The Isolated Danger Symbol is displayed if any underwater feature like wrecks, rocks or other obstructions has a depth less than the safety contour in waters beyond the safety contour.
Related Read: When Should Officer on Watch (OOW) Call the Ship’s Master?
Safety Depth Setting:
The sole purpose of the safety depth is to portray spot soundings either in gray for deeper depths or black for shallower depths compared to the safety depth value entered by the navigating officer thereby highlighting the potentially safe and unsafe areas. The safety depth value has no effect on alarms or any other aspect of ECDIS. Safety depth is normally the ship’s draft + squat.
Related Read: How Squat, Bank and Bank Cushion Effects Influence Ships?
Now the question is why do we need to mention safety depth when safety contour can demarcate between safe and unsafe waters? It is also logically to select Safety Depth equal to Safety Contour.
Some soundings on the shoaler side of the safety contour will be gray because they are deeper than the safety depth set by the mariner, although shoaler than the safety contour selected by ECDIS. The depths below safety contour may not always be non-navigable. Suppose for example if safety depth and safety contour are set to 11 m, the ECDIS will emphasize the depth contour equal or deeper than the selected contour which say is 20m, whichever is available in the ENC.
Related Read: How ECDIS Can Be Further Improved – A 2nd Officer’s Perspective
Thus we can see that water areas with depths between 11m to 20 m are navigable but are below the safety contour. This provides the mariner with additional information about where the ship could most safely pass if crossing the safety contour is required (an alarm will still sound). This could provide additional maneuvering room in narrow passages where safe depths exist.
There is also a possibility that depths shallower than the safety depth may exist at one point in the navigable waters. Safety depth setting will then highlight this danger.
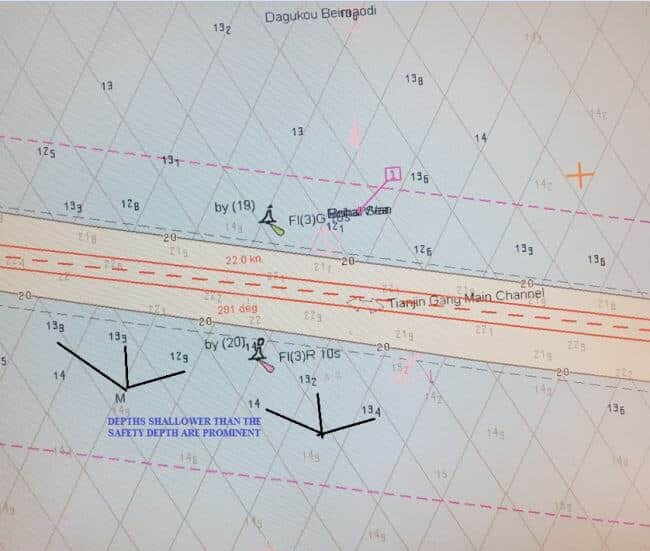
In the picture above, safety depth value is 14m. You can see that depths equal to and below safety depth value are highlighted in bold.
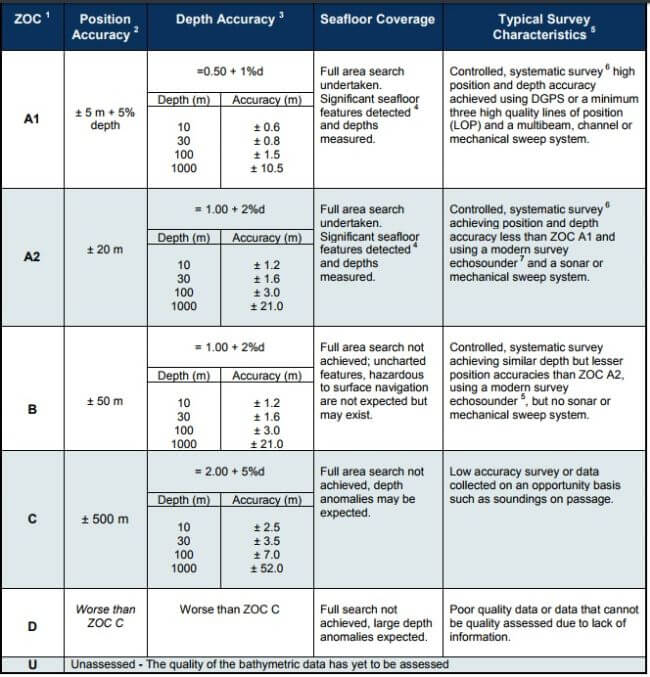
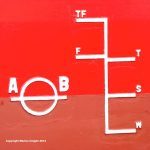
Zone Of Confidence Catzoc:
In calculating safety depth it is also important to consider CATZOC features OR ZONE OF CONFIDENCE. We should be aware that much of the survey data displayed on ENCs derives from data that is many years old and hence cannot be relied upon completely for its authenticity. ZOC is used to determine the accuracy of the underlying hydrographic data. This is available in six categories. It enables the mariner to make sensible decisions on the degree of reliance to place on the chart when planning a passage or conducting navigation.
Let us consider an example.
Ship’s draft = 7.7m
Squat = 1m
Effective draft = 8.7m
Required company UKC is 10% of the deepest draft which is 0.87 approximately 0.9m.
Thus we see that the total safety depth required complying with company UKC policy is 9.6m. Safety depth value can be set as 10m. However, we haven’t yet considered the depth accuracy as per ZOC. Let us consider that Catzoc in this area is category B which implies there can be an error of 1m + 2% of depth = 1.2m. Therefore if catzoc error is allowed, the minimum depth required would be 10m + 1.2m = 11.2m. As safety depth cannot be entered in decimals in ECDIS, we can enter 12 m as safety depth. During passage planning, it is essential that CATZOC is displayed and noted for all stages of the voyage.
Catzoc Category B
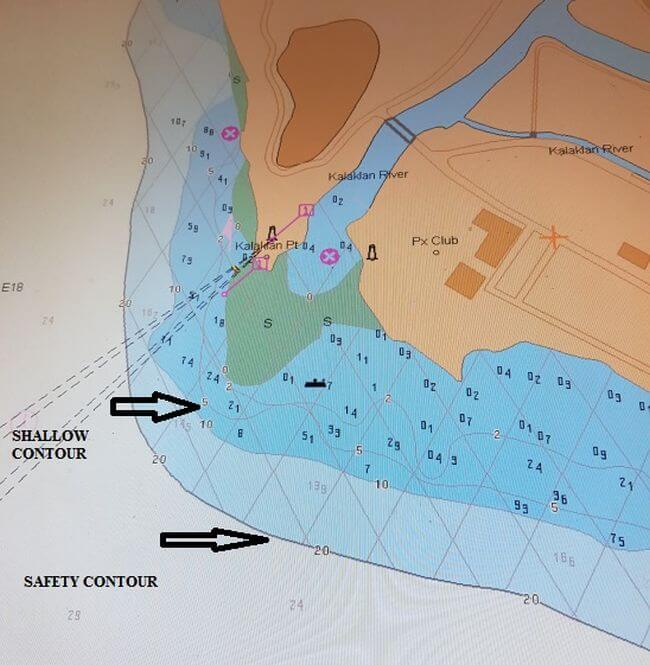
Shallow Contour:
The shallow contour highlights the gradient of the seabed. It is considered to be the grounding depth i.e this is the depth below which the ship will definitely go aground. This value can be set equal to the ship’s draft. Therefore if ship’s draft is 7.7m, shallow contour value can be set as 8m. The ECDIS will then display the next depth contour available in the ENC. All of the areas between the 0m depth and the shallow contour is therefore not navigable at all and appears hatched. As I have already mentioned earlier that the division between safe and unsafe water is highlighted by chart colouring, with blue colour for indicating unsafe area while white or grey for safe areas. The unsafe area is further defined with the selection of shallow contour showing dark blue in the shallow water and light blue between the shallow water and the safety contour when 4 shade display is selected. 2 shade and 4 shade display is further explained below.
Related Read: Why Virtual Aids of Navigation Are Important For Ships?
Deep Water Contour Setting:
This is normally set to twice the ship’s draft. However navigating officers can use deep water contour value the way they want.
ECDIS also gives the option of simple two colour shading. In this situation light blue and deep blue will merge into a single blue colour and grey and white will merge to a single white colour. If the value of the safety contour is changed, the boundary between two depth shades changes accordingly. Two depth shades can be used during night time with caution to reduce the contrast difference between adjacent depth areas.
The picture above shows that the four shade depth option is not selected.
The pictures below show a comparison between two shade and four shade depth in daytime and night time.
Day Time
Night Time
Watch Vector/Anti Grounding Function:
The look ahead or watch vector actually compares the safety settings that have been entered by the navigating officer with the depth information contained in the ENC, and generates an indication or warning where the safety settings will be contravened. It provides advance warning of dangers/cautions, primarily intended to prevent grounding. It acts as a final layer of safety should a navigational danger be missed by the visual check or route scan. The scanned area is sometimes displayed as a cone or column on screen and should be set to a distance appropriate to the amount of navigable water ahead of the vessel. This value should be determined for each stage of the voyage and noted in the passage plan. Many officers fail to realize the significance of the safety contour and do not make proper use of the look-ahead vector.
This is how you can activate own ship check-in Furuno ECDIS.
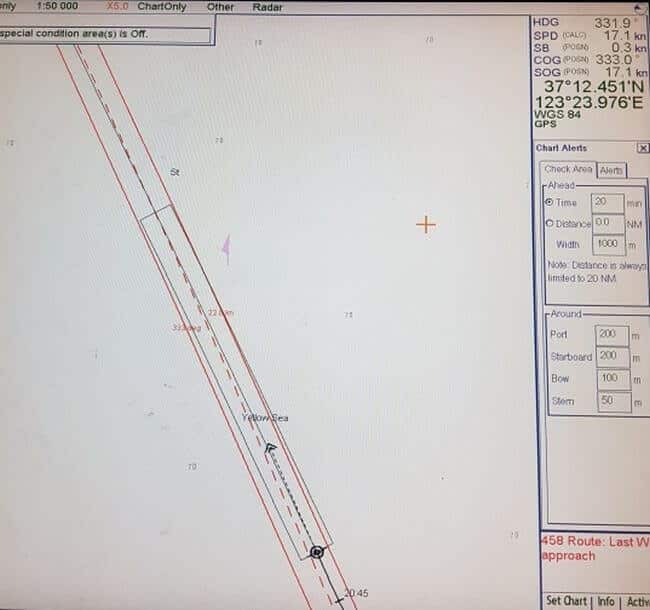
- Go to Chart menu and select Initial Settings
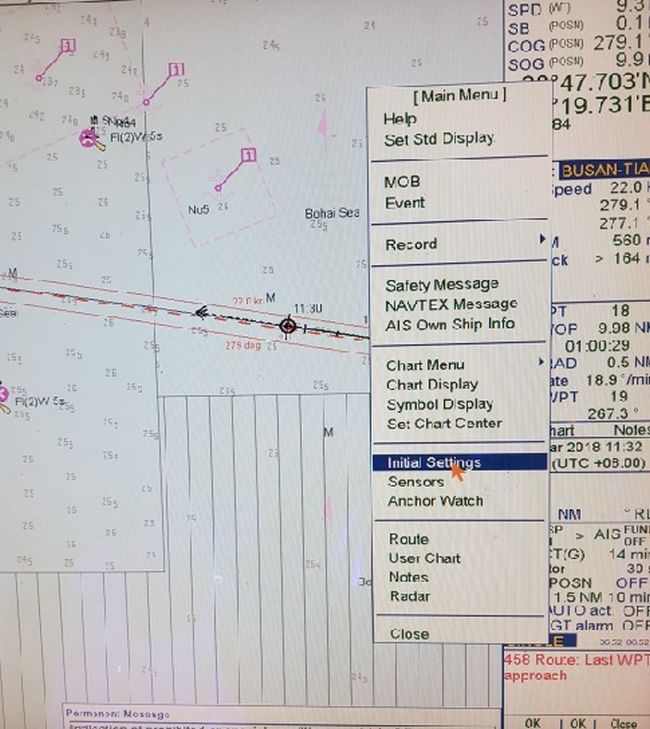
- Open the menu displayed at the left and choose Chart Alert Parameters
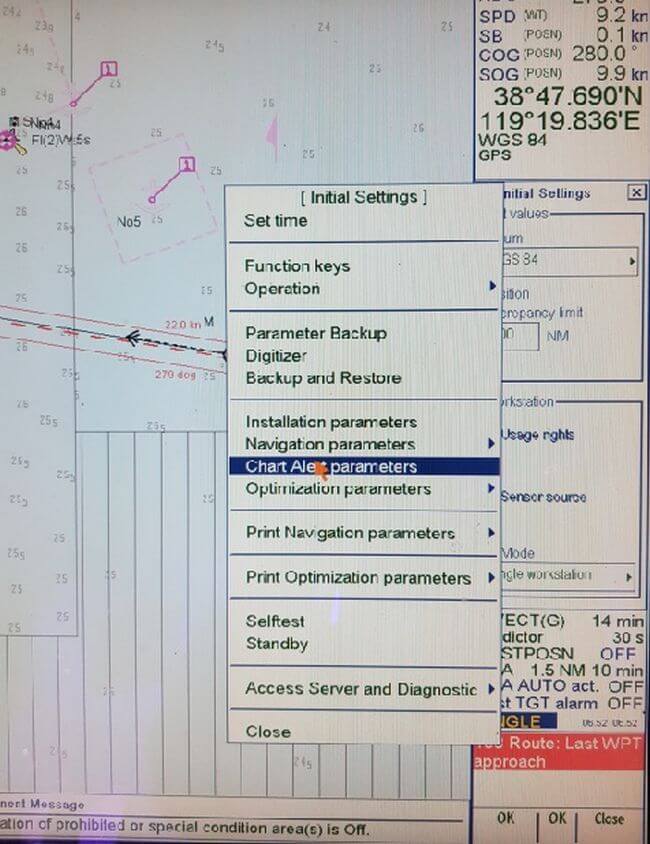
- Click the Check area tab.
- Set Ahead Time or Ahead distance
- The Around field allows the officer to set fixed areas.
Note that the chart alert always uses the largest scale chart available, which may not be the visualized chart.
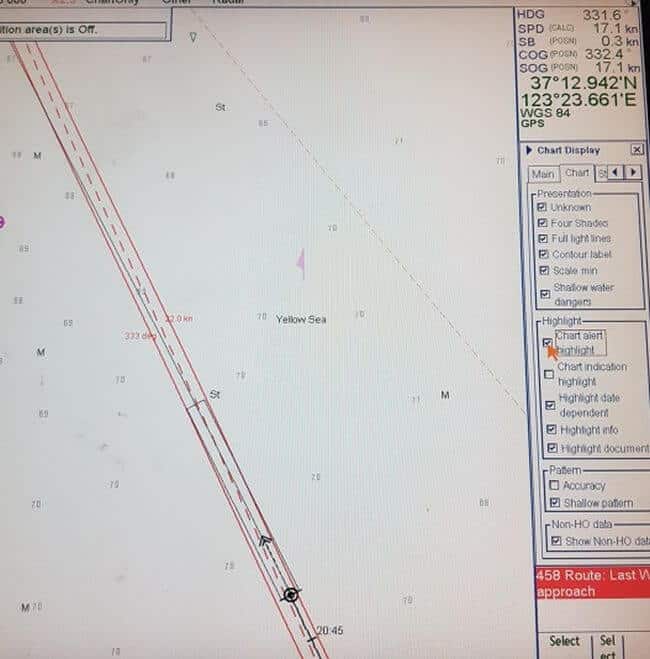
Note that the ‘Chart Alert’ feature should be highlighted so as to trigger the audible alarm whenever safety contour is breached.
It is required to amend the alarm parameters from their previous settings when beginning a new voyage. The alarm parameters need adjustments throughout the voyage to ensure they are optimized for the prevailing circumstances and conditions. ECDIS is a valuable asset in assisting navigators and providing them with more detailed situational awareness. However, until used accurately and properly, ECDIS may contribute to accidents rather than preventing them.
Related Read: How to Order Electronic Navigation Charts and Keep Them Updated On Ships?
Increased training and practical use will help to develop and create a better ECDIS mindset. Trainee officers should be encouraged to understand the benefits that Ecdis provide and make the optimum use of the same. During route planning, a chart alert calculation should be done to detect any dangerous situation and the same should be modified as necessary. A better understanding of ECDIS safety settings and their proper use can act as a potential barrier to the grounding of ships and any untoward situation.
Disclaimer: The authors’ views expressed in this article do not necessarily reflect the views of Marine Insight. Data and charts, if used, in the article have been sourced from available information and have not been authenticated by any statutory authority. The author and Marine Insight do not claim it to be accurate nor accept any responsibility for the same. The views constitute only the opinions and do not constitute any guidelines or recommendation on any course of action to be followed by the reader.
The article or images cannot be reproduced, copied, shared or used in any form without the permission of the author and Marine Insight.
Do you have info to share with us ? Suggest a correction

About Author
Paromita has completed graduation in Nautical Science and is presently preparing for 2nd mate exams. Besides sailing, she loves to read books and travel. She has also won many awards in music.
Latest Marine Navigation Articles You Would Like:


Subscribe To Our Newsletters
By subscribing, you agree to our Privacy Policy and may receive occasional deal communications; you can unsubscribe anytime.
Very Informative. Especially now a days when ECDIS is mandatory. However i was wondering wouldn’t it be better to use Draft + Squat as Grounding Depth( instead of just the draft)
Very nice indeed and thank you for this very informative subject presentation.
Anyway, our vessel’s ECDIS Furuno FMD 3200 is not showing larger text display of depth soundings.
The depth soundings is only a dot in size and unreadable and even the target ship’s AIS symbol is very small also.
Pls. help and advise what to do to enlarge the text or side of the depths soundings and AIS symbol to a readable size.
Thank you very much for your kind attention.
Mr. R. Toga Jr.
What is base CD USED IN ECDIS AND HOW TO ORDER THE CHARTS . WHAT IS CHART MANAGER CHART ASSISTANCE. . PLX
Nice topic. Proficiency in the use of ECDIS can be attained only through practice and serious effort of the navigator to learn the proper way of using the ECDIS, knowing the capabilities and limitations of the equipment and most of all, not OVER RELYIN on it. It should be borne in mind that automation like ECDIS is not perfect. Every one using it should verify and cross-check any information provided by the equipment. Maintaining good situational awareness is an additional thing to practice when navigating with ECDIS. This could further validate the accuracy of the information obtained from it.
How to update chart catalloge which is inside the Transas Ecdis